As occasionally happens here at Sweet Juniper Woodcraft, this text is actually written by Jim. Hopefully, Wood will be back in this space very soon to share her latest knitting project or her efforts to sew the kids' Dutch costumes for this year's Tulip Time.
Part 1: The Wagon
This is what I started with, a 10-year-old Babyjogger Twinner II double jogging stroller, I purchased on craigslist two years ago for $75. I just checked on our local craigslist and saw dozens of ads for double jogging strollers, and I'm pretty sure there would be a way to do this with a single jogging stroller with bike wheels too (although I do like how wide and stable the double strollers are). I wasn't sure I wanted to give up the double jogging stroller for good, so everything I did to turn it into a dog cart is completely reversible. Our Twinner had 20-inch wheels, but I'm sure it would work for one like this with 16-inch wheels in the back.
Step One: Remove All the Crap You Don't Need
I used a socket wrench to detach the front wheel, brake assembly, and the tubing that attached the seating piece to the chassis. I took off any extraneous pieces until I was left with nothing but the rear axle, wheels, two 6-inch posts sticking out from the rear axle (to which I planned to attach the basket), and the two poles leading to the front wheel.
Step Two: Take Any Pieces from the Crap You Just Removed that Could Prove Useful
I removed two of the aluminum poles from the seating piece that were already bent in a way that would make them useful as shafts that would connect to the harness:
Step Three: Figure Out a Way to Attach the Shafts
This is where it gets tricky; our dog is ridiculously skinny so we didn't need to create a wide berth for the shafts, and basically just extended the two existing shafts for the front wheel by attaching the seating shafts on the outside of the wheel shafts:
As I mentioned in the initial post, I used hose clamps at first because I was doing this trial-and-error and before I drilled through the metal, I wanted to make sure everything was in the right place. I ended up adjusting the shafts about five times before I got it right, loosening and tightening the clamps as needed. Ultimately, by pointing the shafts slightly outward, even with the rather tight point of origin they created a wide enough birth that the dog isn't cramped (but with a wider dog, you might have to rig up something different. I attached the ends of the shaft together with a 5-inch bolt, but if you attached them together with a 8-10 inch bolt you could stick it right into the pieces that gripped the front wheel and secure it with hose clamps.
If the stroller you use doesn't have the same sort of hardware, improvisation is key. When I built this I literally just took each step as it came and tried to figure out how to do it with the tools and parts I already had. The wagon shafts do not need to be aluminum; you could easily use the wooden handles from that old shovel/hoe/rake you have in the garage or buy new wooden handles (or heavy dowels) at any hardware store and use them as shafts, attaching them to the stroller.You can also buy dog cart shafts on eBay.
I think if you don't want to go the route of a jogging stroller, and even easier option would be one of those little bike trailers you see people pulling their kids around all over town. The advantages I see with the trailers are (1) they're already designed for pulling; (2) they have lawyer-tested seats already built in; and (3) if you don't have one in the back of your garage already, they are super cheap on craigslist (often $50 or less). They're the sort of thing everyone just wants to get rid of when their kids get too old, so if you're savvy you can get one CHEAP.
Personally, the first thing I would do is get rid of all that ugly plastic and strip the thing down to the chassis as much as possible while keeping the seats. Then I'd figure out how that shaft is connected on the side and replicate it with another shaft on the other side. Beta Dad rigged up something like this with purchased cart shafts, and wrote about it here. I think a trailer like this would be PERFECT for creating a center-shaft wagon designed for two (or more) dogs. You'd have to do some research on team pulling websites to figure out the harnessing details (I refuse to go there). But it could be really cool.
Step Four: Attach Some Kind of Seat
If you're using a jogging stroller, the last couple steps are easy. First, the seat. I used a child bike seat designed for handlebars and just played around with it until I found a spot where it was (1) balanced well on the rear wheels; and (2) easily attached to the frame.
Again, I slid a 6-inch 1/4 width bolt through the holes in the seat legs once the seat was placed in the frame and then slide a huge hose clamp through existing holes in the seat to attach it in the back. It wasn't intentional, but the clamp has some "give" and acts almost like a spring when the wagon bounces.
Step Five: The Basket
I found a wire basket in my neighbors' trash the week I was working on this. I'm pretty sure these are like $2.00 at IKEA. I attached the basket to the frame with more hose clamps (about six) using those 6-inch stubs left sticking up from the axle (mentioned in step one above).
Step Six: The Mother-in-Law Seat
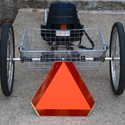
One of the old cars my dad fixed up when I was a kid had what he called a "mother-in-law seat" that folded out of the back and must have provided a dusty ride. I am still working on building a second-seat for our wagon, scouring eBay and thrift stores for an old booster seat or bike seat like the on on the Popscycle that can fold down when we need the basket for groceries. Even more importantly, I need something at the back of the basket to attach this sweet Amish warning triangle we bought at the Feed & Seed the other day:
Now I only have to commission this girl to make us a yoder beard for Gram and the Amish look will be complete.
Part 2: The Harness
This part is actually really easy if you're not cheap. There are tons of people selling dog-carting harnesses online. eBay probably has the cheapest ones, this guy makes some pretty nice looking ones. Expect to spend anywhere from $35-80, with strict limits on neck size. But if you're cheap like me or your dog is smaller than the widely-available neck sizes, you can make your own harness. I found this explanation for a traditional Siwash harness on a site devoted to Newfoundland dogs:
This post does a great job of detailing how you want the shafts to fit into the harness and how to avoid dangerous set ups. I noticed that custom leather harnesses were selling for hundreds of dollars, and because I love his Filson bridal leather collar and leash so much, I thought I'd make his harness out of quality leather too. Plus, if we ever need Wendell to haul back some goods purchased at the Folsom Street Fair, he'll be dressed for it.
To build the harness, I went to the thrift store (with a 50 percent off coupon!) and bought six leather belts; I was more interested in the quality of the leather than the color, so it's a bit mismatched. As I mentioned in the first post, I was walking out of the thrift store and noticed an old leather golf bag for $3.70 ($1.85 with coupon!); the leather wasn't the best quality, but the shoulder strap was heavy duty and made a perfect starting point as the padded-collar portion of the harness (I had been planning to use sheepskin). Even better, the golf bag was covered in brass rings and clamps that would prove useful in building the harness. I'd say to build a decent harness you'll need the following:
Materials:
5-6 Leather belts
5-6 Brass rings
A bag of 50 Brass leather-working rivets (available almost anywhere, usually with a setter) Be sure to buy rivets with shafts long enough to go through two belts and still catch in the buck-tail.
4-6 1" Brass Halter Snaps
4-6 sturdy keychain rings
Tools:
An awl or leather punch
Rubber Mallet (or hammer)
Heavy-duty scissors or a knife to cut leather
You're going to need an awl; it's the kind of thing you never want to leave around the kids:
You can buy special leather punches, but an awl is cheap and does the job quick and easy. You could probably improvise with a power drill if you don't have an awl. When I needed to punch a hole, I laid the leather out on the ground and drove the awl right through it whenever I needed to connect two pieces of the leather with a rivet.
To construct the harness, I printed out the diagram above as well as a couple photos of dogs in professional harnesses (please don't use mine) and just fit the belts around him, starting with the padded piece that would go around his chest. There was a lot of trial and error (mostly with where to place the cinch's for the shafts and the traces.
The traces are simply leather belts cut to a length that will keep the dog pulling the wagon by the traces rather than the shafts, with a halter snap at each end. Remember that the shafts are there for turning and braking, not for pulling. I added a brass ring extending out of the sides of the harness to guide the shafts through to keep them away from his body. This is not part of a standard siwash and was pure improvisation.
The halter snaps at the dog end of the traces attach to a brass ring located right where the diagram says the dog should be pulling from; the halter snap at the wagon end attaches to a keychain ring I ran through holes in the original jogging stroller chassis. You may need to improvise something different depending on the equipment you choose to modify.
I know this isn't a pure "how-to" but more like a basic guide to help anyone interested in building a dog cart/sulky . If I can do this with so little technical expertise, tools, and experience building stuff, some of you talented people are going to be able to create some amazing carts. Enjoy, and if you do this be sure to e-mail me some pictures and share your stories.
































You wouldent happen to have that seat and sun cover and wheel you took off of the old twinner stroller do you ? ... i have a need for them :)
Skyfire1@hotmail.com - christina
Great project! Found a single jogging stroller and with random unused stuff around the house it only cost me about $20 for the harness and links all from Walmart.
This is a TERRIBLE concept...all the weight of the person sitting in the seat is FORWARD of the wheel axle...therefore all the weight will be on the dog's back! Dogs aren't horses, they can't take ANY weight on their backs, so this is a recipe for disaster. I know, I have run a proper canine sulky for over five years--it was difficult to afford, but I know it's engineered properly and my dogs and I are safe and healthy.
I don't think the concept is terrible, but I agree that the seat is way too far forward. It should be over the axle. Horse carts are built this way too. Other than that, though, I think the idea is sound. I'm planning on training a goat wether to drive, so I'll definitely be trying this at least as a training rig to get him used to pulling. Neat article.
Alibaba.com has sulkies for much less than in US. Also can be made from a welding cart if you weld. PVC too.
I agree with Anonymous above. The seat should be over the axle to create 'lift', the way it is now would allow weight on the dogs back. Dogs have a sensitive spine and unlike horses cannot tolerate a lot of weight. A good first effort but I would look at improving the balance.
I'm leaving my front tire on and am going to get a bar to extend out in front of it to attach the gangline so the dogs will just be pulling and wont have any weight sitting on them for the ones who are concerned about the dogs back carrying to much..so was I so that's why I decided to leave the front wheel to carry my weight plus I have 3 dogs so the way he did here wouldn't work for me but I'm thankful for his post because it has got me on a great start to my cart!Also my jogging stroller I found had a hand break and it is attached to the front tire so there is another bonus I will be adding a ground break to like a sled would have you now for those "oh look a squirrel" moments
Could you email me some pictures of a proper sulky
Alibaba takes your money but sends you a cheap digital thermometer or similar but Not what you ordered!
I would like to see a conversion of a 3 wheel bicycle to a dryland dog sulkie. I HAVE 2 BORDER COLLIES AND 1 GERMAN SHEPARD.
Your thee best
I bought a seat on Fb marketplace for $20. Wheels were $50. Axel from my nephew and a free cigar box to haul doggie bags and a wrench. Hope to ride it in next years Christmas Parade❤️