I got a lot of requests for a "how-to" after sharing the pictures of my kids in the armor I made (and even had a local friend ask me how to make her son a knight costume out of real steel for Halloween). So here are some basic instructions that I hope at least will demystify the process. There's still plenty of time to get something like this done before Halloween.
Materials:
To begin you need a few sheets of steel. You can find these small sheets at every major big box hardware store, but even better check with your local hardware store (most Ace-outlets carry these sheets). They cost somewhere between $5 and $7. If you can upcycle some steel from somewhere else, even better. You're also going to need to get some aviation snips, also available at just about any hardware store. Make sure that the snips are advertised to cut up to (or less than) the gauge of steel you're going to use. The lower the gauge, the thicker the steel, and the harder it will be to cut and work with without specialized tools. One good thing about thicker steel though is that the edges won't get as razor sharp as higher-gauge steel when cut (something I'll get to later).
You'll also need (1) a power drill; (2) a hammer; (3) an awl; (4) a wooden work surface; (5) eye protection; (6) work gloves; (7) cardboard; (8) rubber edge trim or quality electrical tape (9) leather belts and pieces of leather; (10) leather rapid rivets. You can order the rivets online or if you're lucky enough to have a Tandy leather outlet (or other leather working shop) in town, you can find them there. Get a few bags of rivets in various lengths, but medium-length is best for this project. You can also can leather itself at those stores, but it can get pretty expensive. I prefer to get my leather from thrift stores, where you can get a dozen belts for about a buck each (always make sure you only buy belts made out of quality leather). Women's purses, golf bags, briefcases, and leather coats are also a great source of quality leather for projects like this. A couple final sources of affordable leather are furniture factory outlet stores where you can get leather by the pound, or upholstery shops where you can get scraps.
Step One: Brainstorm and Research
What kind of armor does your kid want? Look at picture books about knights or use google image search. I took the kids to the art museum to look at the suits of ceremonial armor to get them excited. I learned about all the different styles of armor. I knew there was no way I was going to be able to make my kids steel gorgets or metal gauntlets, and I wasn't going to be able to heat the metal or weld anything so I had to keep it simple (my dad does have all those tools, and if we'd had the time we could have done something AMAZING). We decided given our time/material constraints, the most important things to make was a simple breastplate with "faulds" to protect the upper thighs and give it more of a "suit of armor" feel. After making the first breastplate in my dad's shop, I made the second in my living room in less than an hour. I planned to make cloaks to cover the backs, so I only had to make the front pieces (though it wouldn't be too hard to add backing).
Step Two: Make a Pattern for the Breastplate/Cuirass
Make a rough pattern by holding a 12x17 or so piece of cardboard up to your kid, bend it the way you want it to bend, and then trace the shape. Cut that out and carefully trace half of it on another piece of cardboard.
Step Three: Cut the Steel
Trace the breastplate pattern on your piece of steel. Try to use as much of the existing straight edge as possible, particularly at the bottom. Then, put on your gloves CAREFULLY cut the shape of the breastplate out with your aviation snips. You will get cuts all over your hand if you do not wear gloves. Try to make your cuts as long and smooth as possible.
Once you get the breastplate cut, you can bend it by hand to follow the contours of a body. Without specialized tools, you can only really bend the steel in one direction. If you want to try hammering it, you can use a rubber mallet and a sandbag to get the shape you want.
Step Four: Blunt the Edge
With the breastplate cut out and shaped, it's time to add some protection to make the armor comfortable to wear. First you're going to have to do something about that sharp edge. I used some extra "rubber edge trim" my dad found in one of the many drawers of wonderful things he has in his auto body shop, but a simple search on eBay reveals all kinds of sizes available for as little as $1 a foot. You can probably also find this locally at a hardware or specialty store. You will need several feet of trim. I attached mine with a contact adhesive like GOOP. In the picture above and below you can see the adhesive along the edge before I peeled it away.
If this is only for Halloween, you might get away with using good electrical tape or something else, but I recommend making sure whatever you use isn't going to slip off during play.
Step Five: Add a layer of leather
With the edges blunted, it's time to attach leather to the armor so it can be worn. Get out your scissors, awl, and scraps of leather. Here I'm using a woman's leather coat I found at the thrift store for $4:
You'll need to go back to your original breastplate pattern and trace the shape onto a piece of thin leather. Cut it out just a quarter of an inch bigger so that none of the steel will actually rest against the body without a layer of leather protecting it. This what it should like on the inside once the leather is cut and attached.
Attaching the leather to the metal is easy and very satisfying. All you do is drill a hole in the metal where you want the rivet to go using a powerdrill. Make sure you clamp down the metal before drilling because it has a tendency to spin, and wear eye protection whenever drilling into metal.
With your hole drilled in the metal, mark off where the corresponding hole goes in the leather, and hammer your awl into that spot.
Once the tip of the awl has penetrated the leather, push the awl through to give yourself a bigger hole. Now it's time to start riveting.
You can buy a kit with a rivet setter and all kinds of other nonsense. I just use a hammer. Push the rivet through the two pieces you're connecting and then set the tip of the rivet into the accompanying base. Then hammer away. After a few bangs, the rivet will be attached to the base and the two pieces are connected.
Step Six: Attach the harness while attaching the leather backing
This is a good time to attach your leather belts to the back of the breastplate so you can minimize the appearance of rivets on the front of the armor. I just took one belt, cut the "buckle" end to fit right in the middle of the kid's back, leaving the other side long for later adjustments.
Step Seven: Make it unique
At this point, think back to the conversations you had with your kid about what kind of knight s/he wanted to be and how s/he imagined the armor would look. Does this knight come from a particular country? Does this knight have any favorite animals? What kind of weapons does s/he use?
Once the back straps are connected, the armor is ready to wear and you're ready to start embellishing it and making it cool and unique. I added "faulds" by cutting pieces out of the leftover scrap and lobstering them down over the thighs, attaching it to the breastplate with a leather lace:
My dad found some old metal shoe horns in his pile of excellent junk that I riveted onto the shoulders for extra protection there. Then I added the cloak and rabbit skin:
On my daughter's armor, I added a couple little special horse rivets I found on eBay at the shoulders:
For armor we thought it would cool if she used the Greek-style "pteruges" armor I made for my son's Hoplite costume last spring. She saw a picture of a Valkyrie wearing such a skirt and really wanted to incorporate it into her costume. This is just a belt with a bunch of other belts riveted to it, with rivets added along the strips to make it look tougher:
I was in a rush and didn't get to make the leg pieces for my son as elaborate as I wanted them. I basically just cut some shapes out of steel, blunted the edges, added leather backing, and tied them around his calves:
I would have liked to have made a backing for those, and maybe do something similar for his arms. I did make some leather arm braces that you can see in a few of the pictures. But before I could go too crazy, I had to move on to the helmets.
Step Eight: Helmets
Every knight needs to protect his or her head. I looked at buying knight helmets on eBay, but the good-looking ones were too expensive and even the crappy-looking ones were too expensive. I wasn't even sure if my kids would wear a full-face covering helmet, so we went with an improvised Norman-style nasal halfhelm.
I started with two 8-inch "Blanda" bowls from the Swedish big box that shall not be named, bending them so they narrowed a bit:
The "nasal" piece is just something I cut out of the scrap metal and blunted. These bowls will just slip off a kid's head, so I had to make liners for the inside. Using scraps leftover from making the breastplates, I criss-crossed belts and then attached triangles of thinner leather to them:
Then I riveted a strip of leather around the outside of each helmet, attaching the liner to the inside at four points and the nasal piece to the outside. My son's helmet had a couple pieces of really stiff black leather for added protection at the cheeks and back. I added leather chin straps to keep the helmets on nice and tight.
Inside my daughter's, I attached a piece of faux-sheepskin to give it that barbarian look:
Step Eight: Final Touches
Every knight also needs a sword. Wooden swords are cheap and plentiful online, but if you have any woodworking skills I'll bet it's really satisfying to make one yourself. I bought two from a woodworker on etsy, and by the time we got them, I'd decided to use all the brown leather on my daughter's armor, while my son's had more of a black and gray theme. That meant I used a really nice heavy leather scrap for her scabbard (hand-sewn):
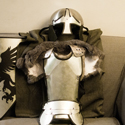
My son's scabbard was rushed, but he got the metal shield with the griffin sigil on it:
I just hand-painted a heraldic griffin with black acrylic paint. On closer inspection you can see how sloppy it is, but from far away it looks pretty cool. On the back, I riveted a leather strip to hold:
As you've been able to see from this tutorial, things can be pretty rough up close and still look nice from further away, particularly when it's all together:
I imagine there are all kinds of cool things you could do differently. If you wanted to do something really cool, you could buy scraps of extra-thick heavy-duty leather and lobster it down the shoulders and upper arm for added protection.You could even make an elbow joint and extend it down to the wrist. I almost painted a griffin on the breastplate, and I think that would look really nice. If your kid wants a visored helmet, I think buying a BMX (or batting) helmet from a thrift store, adding a plastic visor you cut from a laundry detergent bottle and spray painting it silver would be best. Your newly-acquired riveting skills will work on plastic, too.
If you decide to make your kid a suit of armor using any of these ideas, I'd love to see pictures or hear stories of the results. Use the comments on this post or the Sweet Juniper facebook page for any questions.



























0 comments
Post a Comment